Quilted chair cushions from the old shirts
- Irina
- Jul 26, 2021
- 4 min read
In the previous blog post I shared some upcycling ideas for men´s shirts. To continue the theme, I would like to introduce another project for your home from the old shirts - boxed quilted chair cushions. They will help to prolong the life of your chair pads and add a nice color accent to your kitchen. For those cushions I used 9 shirts (with plenty of leftover pieces for smaller projects), an old linen/cotton tablecloth and a piece of duvet cover. I am sure you can find all these textiles in your own home. It is not a quick project as it involves a lot of steps but it is absolutely worth the time!

Templates
I must admit I don´t like drawing templates but if you want the good fit, then you have to do it. It is not that hard.
First measure your chair cushions along the seams. Mine were from IKEA and measured 14" at the top (between Velcro fasteners), 16" at the bottom, 15" from top to bottom and 2 1/2" high.

Draw the Top template according to your measurements first, then add the height (2 1/2") to all sides. You don´t need to add any seam allowances. Measure the widest part of the template (mine was 21") and add 2", that would give you a width of the patchwork panel you need to make 23".

For the back with envelope closure you will need 2 parts (top, marked in turquoise, and bottom, in red). Simply draw two lines 3" from the horizontal center line and cut the templates on the colored lines. You can either draw the templates separately for the top and bottom or just draw on one template and trace the top and bottom onto pieces of baking paper.

First, I cut 2 rectangles 1.5 inches higher than the templates, ironed twice a 1/2" fold and top stitched along the fold. Then I cut the top and bottom pieces with 1/4" SA (place the top stitched fold on 3" line). Place the bottom piece on the top one (right sides up), making sure center lines match and baste where the sides overlap.
Patchwork panel
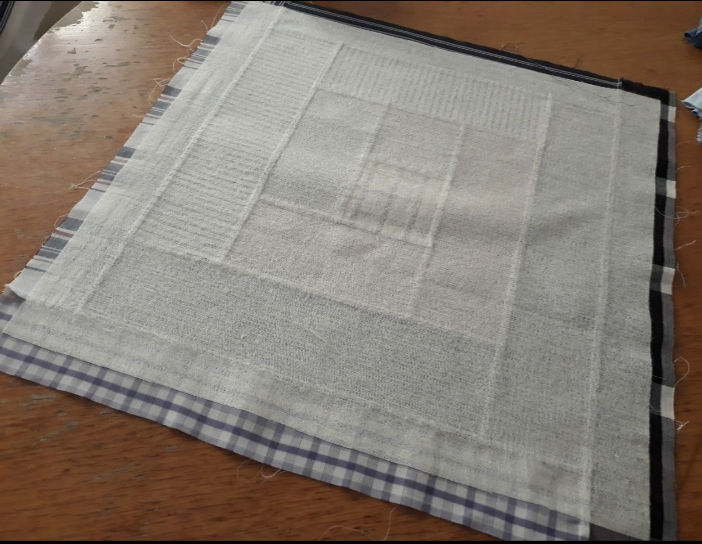
I think shirt fabrics look the best with simple designs. I chose classic Log cabin and cut my logs 4" wide.

When combining fabrics, don´t be afraid to mix colors and prints (for example, checks and stripes) as long as you find it pleasing to the eyes. You can also change the orientation of the stripes in your logs to add visual interest and create contrast.

If the shirts have some text on them or a nice label, make it a design element!

Here are the 6 panels I made. Wouldn´t they make a lovely quilt as well?

Sewing tips
Some people find stitching shirt fabrics problematic. The shirt material is rather thin, so you need to use fine needle and thread for piecing. I used Aurifil 50wt and Universal needle #80. I also recommend using a straight stitch plate (if your machine has it) as it prevents the fabric from being pulled down into the bobbin area, especially at the beginning and/or end of a seam.
Quilting
Since cushion covers are a heavy duty item and we want them to last, I would recommend strengthening the patchwork panels by adding fusible woven interfacing (medium weight) to the back.
Now make a quilt sandwich - a piece of cotton fabric (I used an old soft duvet cover for backing) to protect the batting, the batting, the panel. Pin or spray baste the layers.

Decide on a quilting design. You can opt for a simple quilting along the piecing lines, wonky quilting or even hand quilting if desired. That quilt sandwich could be a great practice piece for polishing your free motion quilting skills as well!
Since these cushion covers are also memory items for my friend´s late father I chose a wreath quilting design. First, I quilted circles with rulers, then added free motion feathers to the wreath and my favorite pebbles to the background.

This is how the quilted panel looked from the back.

Once you finished quilting, stitch around the quilted panel with 2.0 stitch length to secure the patchwork, trim excess of batting and backing fabric. Then wash and dry your panels.
The panels were so soft and crinkly after washing!
Sewing the covers
Cut the front piece from the patchwork panel using the front template without seam allowances (SA). Stitch around the pieces with 2.0 stitch length and ziz zag the cut outs.
Box the corners by stitching the zig zagged edges of cut outs together with 3/8" SA. If you would like to have openings in the corners for Velcro fasteners then leave 1 1/4" in the middle of the corner unstitched, iron the seams open and top stitch around the opening.

Now we shall attach the bottom part to the front part. Turn the front piece right side inside. Make sure orientation of both pieces is correct. Work with one side at a time. I start on the side that faces the back of the chair (between Velcro fasteners). Match the raw edges of both pieces. Using pins or clips, pin the back to the top (right sides together) - the pin is right in the seam and you have 3/8" SA to the left of the pin. Pin on the other seam in the same way (you will have 3/8" SA to the right of the pin), then pin in between.

Stitch from one seam to another at 3/8" from the raw edge, go slowly, remove the pins as you go and stop with the needle in, right in the next seam. Repeat for other sides. Sometimes you need to reach inside the cushion to align the raw edges. Just make sure the fabric is smooth and doesn´t bunch, especially in the corners. Trim the corners on the back piece and zig zag the seam.
Turn the cushions right side out, give a good press to the joining seam.
Look how beautifully they turned out! I also love how soft they are to the touch! And look at that perfect fit!


Totally worth all the time spent! That satisfaction of making new from old is simply amazing!
I hope you would like to make some too!
Happy Stitching!


Comments