What to do with the old shirts?
- Irina
- Jul 14, 2021
- 4 min read
Upcycling is the best way to reuse, rework and re-imagine old textiles. Often we simply don´t like or don´t want to use them in their current form, but yet either those textiles are too good to be thrown away or they hold special memories. It has been very trendy to re-purpose clothing, and to be frank, I love it. Let´s talk about men´s shirts. They are easy to find, either in your closet or at the local thrift shop. There is also plenty of fabric in that garment, and the material is always easy to work with.
I hope this blog post will get you in the upcycling mood and inspire you to save shirts from the landfill.
Deconstruction
Upcycling always starts with washing and the deconstruction of the garments. It doesn´t matter if the items have been laying around at your house for a while, or you got them from someone. It is much more pleasant and enjoyable to cut freshly laundered material. It also helps to get rid of the stains and get more fabric at the end as well as cut the fabric in the most effective way if the stains remain.
I use scissors and always start by cutting off the bottom hem, then one of the button panels on the front all the way to the collar (yes, you also tear the panels!),then the collar,and finally the other button panel all the way from the collar down to the bottom (you can tear that one as well). Tearing gives you the idea how strong the fabric is and speeds up the process. It works well for most of the fabric except for high quality 2-ply yarns.

Cut off / tear the front panels at the side seams.

Cut the cuffs, cut the seams off and you will have 2 parts (one interfaced, another without interfacing). I put them aside separately in 2 piles for small projects.

Fold the sleeves at shoulder seams and then cut the sleeves off.

Cut out the thick seam on the sleeves. I usually leave the slit around the part where cuffs were attached as it was.

Now cut off the side seams on the back part and the seams around double sided part that goes to the neck. It will give you three pieces of fabric. I usually store the shoulder parts separately for small projects.

Cut the buttons off the button panels and from the cuffs parts if desired. Personally I save only the prettiest buttons.
Iron all the pieces, fold them and wrap in the back piece folded along the center of the back part .

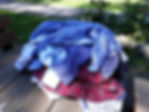
I usually cut shirts in batches of 5-10 depending on how much time I have. Here is the the result of one of the cutting sessions (9 shirts, 1 hr 20 min).
Cutting stage is a satisfying and meditative process. Even though it is time consuming I think it is a perfect prelude to the next stage (deciding on the project and actual design), as you can evaluate the colors, fabric composition and amount of the material you have.
Despite being thought as all the same, men´s dress shirt material can vary a lot. You can find them made from natural fiber 100% cotton or from a synthetic/cotton blend. I prefer using cotton for my projects but I do keep some of the synthetic ones if the colors fit in the palette and content of synthetic fiber is not more than 35%. You can check the inside care label on the dress shirts, if unsure.
There are some other qualities of the fabric to consider for patchwork projects - weight (light/thin or heavy/thick) and stretch. I do keep the thin shirts, as you can always add fusible interfacing to strengthen the material, but I found from experience that stretch fabrics can be problematic in stitching and quilting.
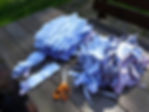
Once all the fabric is cut, I arrange it by color to get the inspiration for the design from the color palette. Isn´t that pile neat and beautiful?

Choosing a project
I recommend starting with a small project. Not only is it more manageable but it also gives you an idea how to work with shirt material. Then you can attempt a larger project.
I started by making a fabric basket from the interfaced cuffs parts. You can find the tutorial for the basket here.

I used the same measurements as in the tutorial. First I made a patchwork panel. Since the width wasn´t enough, I added a piece of fabric from a sleeve. I used a fusible foam stabilizer to strengthen the fabric and make the basket sturdy. I quilted the cuff part just along the piecing lines and the sleeve part in cross-hatch using my regular sewing machine foot.

A piece of a front panel used for lining. It took around 2 hrs to make, but I absolutely love the result. That small fabric basket is perfect for holding rolled napkins, small guest towels, washcloths or whatever you fancy.
The next make from the cuffs part without interfacing was a Patchwork Sunglasses case. You can find the pattern here
I added accent red color to the blues in the center of the log cabin block as well as picked the binding with a bit of red to emphasize the simple design.


In the Rounded pouch I used shoulder parts for 2 1/2" squares and added a tiny foundation paper pieced heart.


As a special personal touch I added a shirt label to the lining.

I also found that shirts are perfect for English paper piecing. I am currently working on a hexagon panel from 3/4 inch hexagons. My stitching with Aurifil 80wt simply disappears in that material. I think that fabric looks great in the simple hexagon shape.

I am surprised how much I like these simple stripes and checks together in the final product even though these as not my usual colors or prints. There are so many new things you can make from old ones. I will share more about my other upcycling projects soon.
I feel a great satisfaction sewing repurposed fabrics. A pile of old shirts may not look very inspiring but it is up to you whether to give them a new life or to throw them away. My heart warms when I see what people think of my upcycled makes and how interested they are in recycling. I hope you have an itch to start your own upcycling project now.
Happy Stitching!❤