


Walking Foot Quilting for Beginners: Two Geometric Designs
What is the technique that truly makes a quilt... a quilt? Quilting! It is the step that completely transforms a flat patchwork surface into a textured, three-dimensional piece full of character. In this month's Quilt Calendar with Pfaff Finland, we'll explore machine quilting using the Integrated Dual Feed (IDT) system on PFAFF machines, or a walking foot if you sew on another brand. This versatile technique is perfect for both beginners and more experienced quilters.
Like any new skill, machine quilting requires practice. But it is much easier to master than free-motion quilting. With the fabric being fed evenly by the IDT system or walking foot, you don't need to control the movement of the quilt in every direction yourself. Instead, the machine moves the quilt smoothly while you focus on guiding it along simple lines and curves. This makes it easier to achieve even stitches, consistent spacing, and beautiful results with much less frustration.
Throughout this tutorial, I use the term walking foot quilting, as this is the widely recognized name for machine quilting with a walking foot (or the PFAFF IDT System). We'll practice two geometric quilting designs and transform our practice samples into practical potholders, proving that every stitch is an opportunity to learn and create something beautiful.

Quilting is creative, relaxing, and incredibly rewarding. Let's get started!
Ohjeet suomeksi löytyy täältä
What You'll Need for Walking Foot Quilting
Before we start quilting, let's look at the tools that will make the process easier and help you achieve neat, consistent results.
IDT System or a Walking Foot
For this type of quilting, you'll need either the Integrated Dual Feed (IDT) system on your PFAFF machine or a walking foot if you use another sewing machine brand. If you're using a walking foot, make sure it is installed correctly before you begin.
A Guide for Evenly Spaced Lines
One of the secrets to beautiful straight-line quilting is keeping the spacing between your quilting lines consistent.
A few simple accessories make this much easier:
a) Seam Guide (Edge Guide / Bar Guide)
PFAFF machines include a seam guide, and most walking feet also come with one. It is a metal bar that you slip into the accessory hole in the back of the presser foot shank on the Pfaff machines.

Once you've set the desired spacing, simply guide the bar along the previous quilting line. Since the guide references the last row of stitching, only the very first quilting line needs to be marked. It can be used to space quilting lines up to approximately 2¼" (5.7 cm) apart.
b) Adjustable Guide Foot for the IDT System
For quilting lines spaced closer than 1⅛" (2.9 cm), I recommend using the Adjustable Guide Foot for the IDT System. It has a built-in ruler that provides more accurate and repeatable spacing than the edge guide.

c) Adjustable Laser Guide
If your sewing machine has an adjustable laser guide, it is definitely a bonus.
For this tutorial, I'm using the PFAFF quilt expression 725 sewing machine, kindly loaned to me by Pfaff Finland. The laser guide on this machine can be adjusted up to 30 steps to the left or right (approximately 1" / 2.5 cm), allowing you to position it exactly where you need it. The laser projects a clear reference line about 1⅞" (4.8 cm) long, making it much easier to maintain accuracy, especially when quilting designs include intersecting lines.

Straight stitch plate
For the best results, use a straight stitch plate if your PFAFF machine has one. This plate guarantees even fabric feed at the beginning and end of a seam, while preventing the fabric from being pulled into the needle plate. Because machine quilting uses only a straight stitch, a straight stitch plate is the perfect option.
Marking Tools
The choice of a marking tool depends on both your fabric and the quilting design.
For light fabrics, a Hera Marker is an excellent option. It creates temporary indentations that don't need to be removed afterwards. I mostly use it for simple designs with only a few reference lines, as the markings can be difficult to see when a design requires extensive marking.

Over the years I've tried many different marking tools. Everyone has their own favourites, but these are the ones that work best for me:
Blue water-erasable markers – I used Leonis markers for many years and loved them. Unfortunately, shipping from Japan has become quite expensive, so I've switched to Bohin and Clover water-erasable markers, both of which have worked well.
For dark fabrics, I use white marking pencils, chalk pencils, or soap. I've tested white marking pencils from Clover, Bohin, and Prym. Of these three brands, I prefer the Clover pencil, although I still haven't found the perfect white marking tool.
Remember that every fabric behaves differently, so it's worth taking a minute to test your marker before you start. It can save you from an unpleasant surprise later!
Quilting Designs
Materials:
four 8" (20 cm) fabric squares (I quilted each design twice). I used improv blocks from recycled denim.
four 8½" (21.5 cm) squares of batting
four 8½" (21.5 cm) squares of backing fabric. I used a recycled bed sheet for the backing.
Thread:
I used Aurifil 40wt (colour 2024) at the top and Aurifil50 wt in the bobbin. For the decorative stitching, I switched to Aurifil 12wt (colour 2390).
If you use Aurifil 12 wt, you will need to adjust the top thread tension on your sewing machine. On the PFAFF quilt expression 725, I lowered the top tension from 4.8 to 3.8, although the ideal setting may vary depending on your machine and thread.
Needle:
90/14 Topstitch needle
Stitch length:
This is a matter of personal preference. I usually use the default 2.5 mm stitch length with Aurifil 50wt, 3.0 mm with 40wt, and 3.5 mm with 12wt. I recommend stitching a few test lines on a practice sandwich to see which stitch length you prefer.
Quilting Design 1 - 45° Crosshatch
1.1. Mark the diagonal lines on the 8" (20 cm) square as shown in the photo below. Then make a quilt sandwich by layering the backing fabric (right side down), batting, and the denim square (right side up).

1.2. Set the guide (seam guide, adjustable guide foot, or laser guide) to a spacing of 1" (2.5 cm). If you're using the laser guide on the PFAFF quilt expression 725, move the laser 28 steps to the right.
1.3. Stitch the first diagonal line.

1.4. Align the guide with the previously stitched line and stitch the next quilting line.

Align the guide with each previously stitched line and continue quilting the remaining lines to the left of the diagonal.


1.5. Turn the quilt sandwich 180° and repeat the process to quilt the remaining lines to the right of the diagonal.
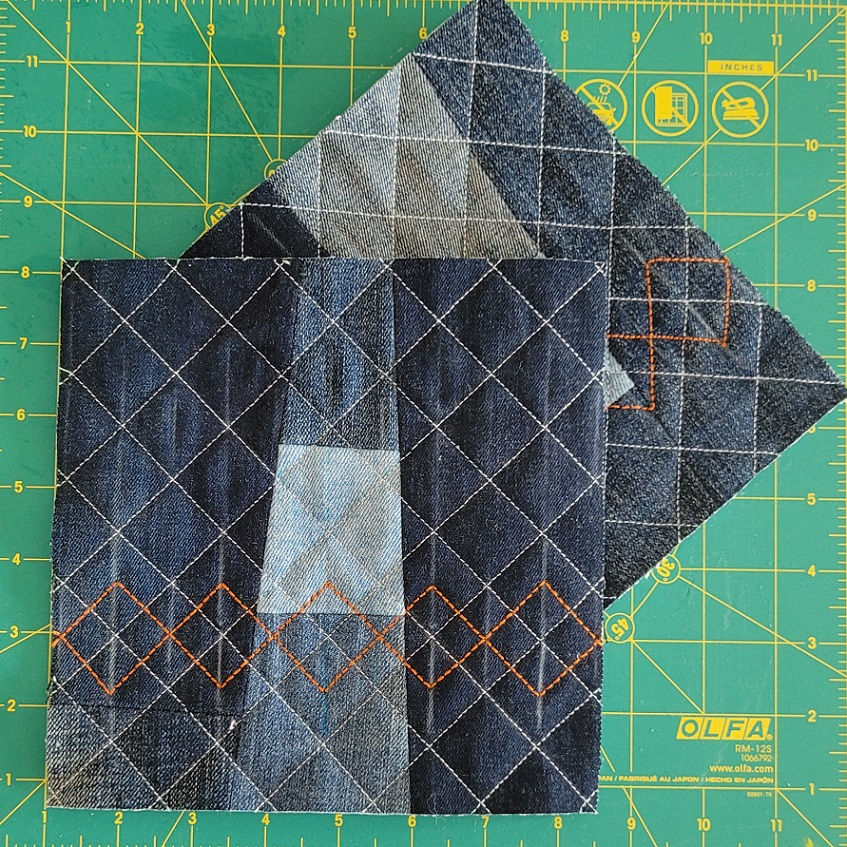
1.6 Next, stitch along the second marked diagonal. Then, using the same method, quilt the remaining lines to the left and right of the diagonal. The crosshatch is ready!
1.7 Now we'll add the decorative stitching using a thicker thread.
Set your guide to ½" (1.3 cm). Then mark the reference lines as shown in the photo below (marked in red and white).

1.8. Start on the right-hand side. The yellow arrows in the photo below indicate the direction of stitching.

Stitch ½" (1.3 cm) away from the previously stitched line until you reach the first long reference line from the left (Point 1 in the photo above).

Pivot 90 degrees and continue stitching to the next long reference line.


Continue in the same way until you reach the left edge of the quilt sandwich (Point 6). Without cutting the thread, stitch through the batting to Point 7, then continue stitching back towards the right-hand side, following the blue arrows.


1.9. Quilt a second practice sandwich—you'll be surprised how much easier it is than the first.
Quilting Design 2 - 60° Diamond Crosshatch
2.1. Mark the vertical and horizontal centre lines on the 8" (20 cm) square. Align the 60° line on your quilting ruler with the bottom edge of the square, making sure it passes through the intersection of the centre lines. Then draw the line.

In the same way, draw another line in the opposite direction.

2.2. Make a quilt sandwich.
2.3. Set the guide to 1" (2.5 cm). Quilt the 60° Diamond Crosshatch using the same method described in Steps 1.3–1.6 for the 45° crosshatch.

2.4. Now we'll divide the diamonds to the right of the 60° diagonal (highlighted in yellow) into four equal parts.
Start on the right-hand side. If you're using the laser guide, set the laser to the centre position. Stitch through the points of the diamonds, dividing each diamond into two equilateral triangles. Continue until you reach the 60° diagonal. Pivot 90°, then stitch straight to the bottom edge of the square, as shown by the red line (1) in the photo.

2.5. Repeat the process to quilt the lines below and above the first line. As you work towards the edges, you will eventually only need to stitch the vertical lines to complete the design.


2.6. If desired, finish by adding a line of decorative stitching using the heavier thread along the diagonal that divides the two designs.

2.7. Quilt another practice sandwich and notice how much easier it feels than quilting the first one.

Turn Your Practice Pieces into Pot Holders
Make the loops: Cut a strip 1¾" × 7" (4.5 × 18 cm). Fold it in half lengthwise and press. Open it up, then fold the long edges in to meet the centre crease and press again. Fold it in half along the original centre crease and press once more. The finished strip should measure approximately ⅜" × 7" (1 × 18 cm). Topstitch ⅛" (3 mm) from the open edge. Cut the strip into two ⅜" × 3" (1 × 7.5 cm) loops.
Make the hanging loop: Cut a strip of denim 1¼" × 14" (3.2 × 35.5 cm). Press and topstitch the hanging loop in the same way as described in Step 1.
Trim your practice pieces to 7½" × 7½" (19 × 19 cm). If desired, round three corners of each piece. Make sure that two of the pieces mirror each other in the placement of the rounded corners.
Fold one loop in half and baste it to the top edge of one practice piece, positioning it ½" (1.3 cm) from the left edge. Baste ⅛" (3 mm) from the top edge.

Place two pieces right sides together and stitch around the potholder using a ⅜" (1 cm) seam allowance, leaving an opening of about 3" (7.5 cm) for turning. Trim the seam allowances to ¼" (6 mm) using pinking shears. Turn the potholder right side out through the opening and press well with steam. Sew the opening closed by hand.
Thread the denim hanging loop through the fabric loop and tie a knot.
This is how my reversible potholders turned out! Aren't they stylish? I absolutely love the simplicity of the piecing, the precision of the quilting, and the decorative accents are just the perfect finishing touch. They have a beautiful Japanese-inspired feel that I really enjoy. I photographed them at the café in the Gallen-Kallela Museum in Helsinki, and I think the setting suits them perfectly.


I hope you'll create your own version and share it on Instagram! Please tag @nordiccrafter and @pfaff_suomi so we can admire your beautiful creations.
If you enjoyed this free pattern, please respect the time and effort that went into creating it. This pattern is provided for personal use and gift-making only and may not be sold, redistributed, or used for commercial purposes.
Happy Quilting!💖


Comments