Improvise with denim!
- Irina
- 22 hours ago
- 5 min read
June is here! For me, it always means the end of school, the beginning of holidays, and long days by the sea and the beach. I think of warm sunshine, water glittering in the light, and that unmistakable sense of freedom that only summer brings.
This month, in our Quilt Calendar with Pfaff Finland, we are exploring improvisation. And it couldn’t feel more fitting for June. What does this technique have in common with the way this month feels? Improvisational piecing is all about freedom: freedom from perfection, from strict rules, and from expectations. It’s about creating expressive, one-of-a-kind pieces, guided by intuition and your own creative rhythm.
For this month, I designed something special using repurposed materials. Together, we’ll explore intuitive piecing, work with a simple improv block featuring gentle curves, and turn it all into a practical and stylish beach bag.
Let’s improvise!

You Will Need
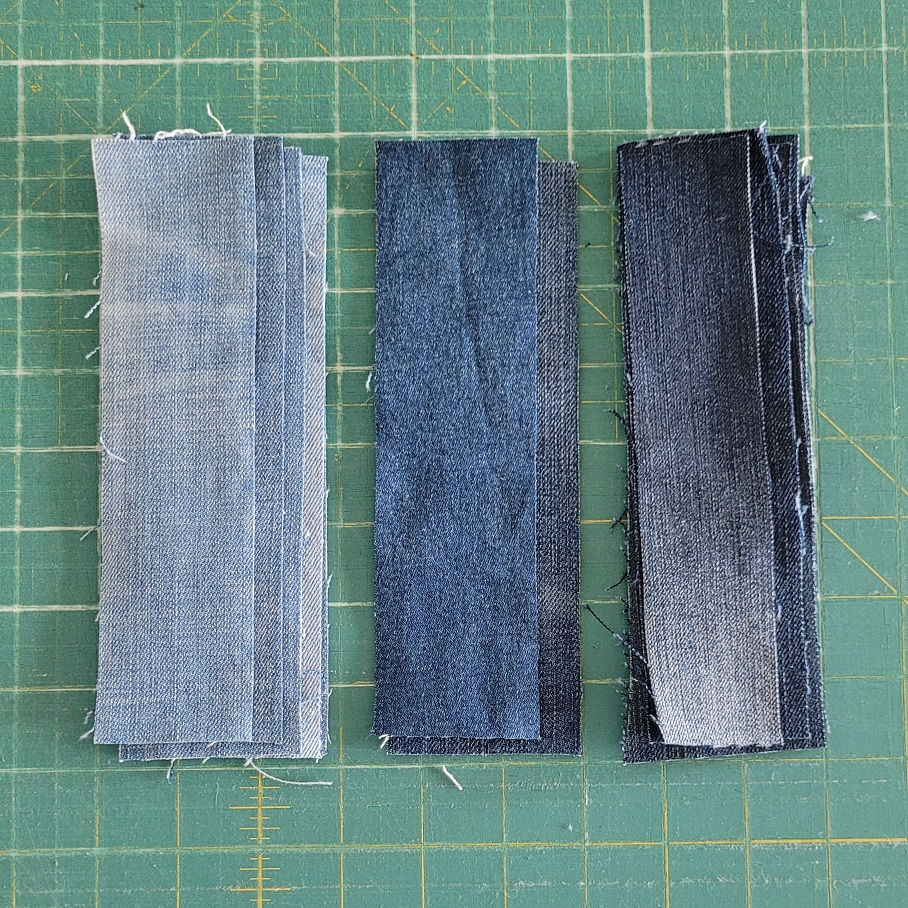
An assortment of denim pieces in dark, medium, and light blue
One denim pocket for the back (optional)
Lining fabric (I used an old dress shirt). If your fabric is thin, I recommend adding a lightweight fusible interfacing
2 pieces of batting, each 17" × 19" (43 × 48 cm)
2 woven straps for handles (I repurposed an old belt). My pieces were 17 ½" long
(44.5 cm). I recommend making the straps slightly longer if you’d like to wear the bag comfortably on your shoulder.
Rotary cutter, cutting mat, sewing machine, general sewing supplies
Ohjeet suomeksi löytyy täältä
Making the Block: Gentle, Freeform Curves
1.1. Cut 7–8 strips in varying widths, 2–3 inches wide × 7½ inches long (5–7.6 cm wide × 19 cm long). Arrange the strips in stacks according to value (light, medium, and dark).
1.2. Place two strips on top of each other, right sides up, overlapping them by about 1” (2.5 cm). Remember to think about contrast - use one dark blue and one light blue piece of denim.

1.3. Using a rotary cutter, cut a gentle curve through the overlapping area, making sure you do not cut outside the overlap. Remove the offcut from the left side of the dark piece and from the bottom of the light piece. You will be left with two pieces that fit together perfectly.

1.4. Sew two pieces together using a ¼” (0.6 cm) seam allowance (use a ¼” sewing machine foot if you have one). Press the seam open.
1.5. Repeat this process for the remaining pieces, adding one strip at a time (steps 1.2 - 1.4). If a strip is narrow (2 inches / 5 cm), you can overlap it by ¾ inch (1.9 cm); this will create a more gentle curve.

For extra variety in color and texture, you can also use the wrong side of the denim (an arrow in the photo below).

1.6 Keep adding pieces until your block is approximately 7 inches (18 cm) wide. Trim the block to 6½" × 6½" (16.5 × 16.5 cm).

Making the Template for the Bag
2.1. Cut a rectangle 16" × 18" (41 × 46 cm) from paper.
2.2. Using a plate, mark rounded bottom edges. I used a plate 7⅞" in diameter (20 cm). Cut along the marked line with scissors to create your template.

2.3. Fold the template lengthwise, so it measures 8" × 18" ( 20 × 46 cm). Bring the bottom left edge (the bottom center point of the folded template) over to meet the right edge, as shown in the photo below.

2.4. Mark the darts on the fold: 2 inches (5cm) up from the bottom of the fold and ¾ inch (1.9cm) to the right of the fold ; see photo below for details. Cut the darts out with scissors.

2.5. Mark a horizontal line 8 inches (20cm) down from the top to indicate the placement of the block.

Sewing the Bag
3.1. Lay your denim pieces on top of the template, using it as your guide. First, place the pocket, then arrange the pieces in rows, keeping contrast in mind (mix light, medium, and dark tones for balance).
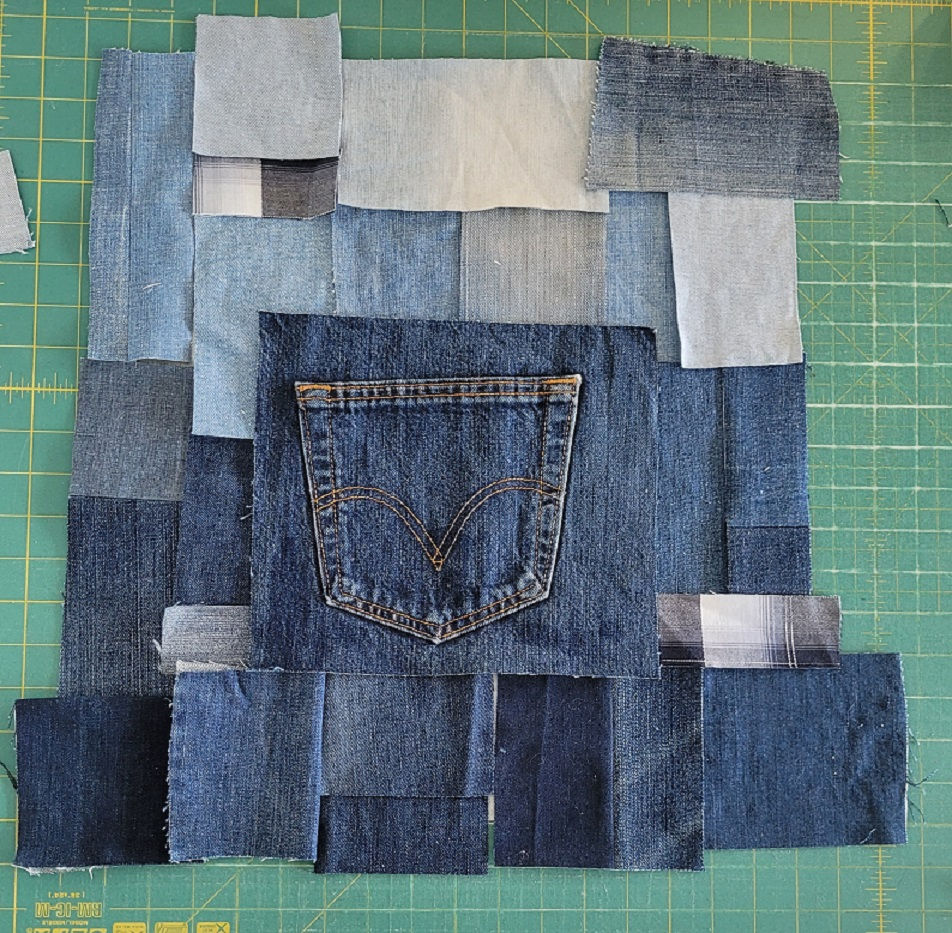
3.2. Sew the pieces together in rows first, then join the rows together to complete the panel.

3.3. The same way, construct the front piece by placing the improvisational block directly below the 8" (20 cm) line as marked on the template.
3.4. Place the batting, then the front piece on top. Pin or use spray baste if needed to hold the layers together, then quilt as desired. Repeat the same process for the back piece.
3.5. Place the template on the batting side of the front quilted panel and trace around it with a pencil. Cut out the front piece with scissors, making sure not to cut the darts. Repeat the same process for the back piece. Stitch around the front and back piece at 1/8" (0.3cm) from the edge using stitch length 2.0 to secure the quilting lines.


3.6. Sew the darts, then trim the seam allowances to ¼" (0.6 cm) and press them to opposite sides: on the front piece, press toward the sides; on the back piece, press toward the centre to help the darts nest.
3.7. Place the handles 3½" (approximately 9 cm) from each side edge. Pin in place and baste by machine. Repeat for the back piece.

3.8. Nest the darts, pin around the bag body, and sew both pieces together using a ¼" seam allowance (0.6 cm). Press the seam open.
3.9. Cut the lining. I used an old dress shirt. One lining piece was made from the back, and another from the front panels, as I wanted to keep the pocket. I buttoned up the front panels and stitched along the button placket so it won’t open (arrows indicate the stitching lines).


Fuse a lightweight fusible interfacing to the back of the lining pieces. Do not cut out the darts. Sew the darts and press them in the same way as in step 3.6.
Pin the lining pieces together and sew them with a 3/8" seam allowance (approximately 1 cm) and leaving approx. 4" (10cm) opening at one of the sides. Press the seam open.
3.10. Turn the lining right side out and insert it inside the denim exterior piece (inside out), with the handles facing down. Smooth the lining and align the side seams, making sure it is distributed evenly inside the exterior. Pin around the top (there may be some excess lining at the top).
Stitch around the top at ¼" (0.6 cm) from the edge, reinforcing the seam at the handles by stitching back and forth for extra strength. Turn the bag RS out through the opening in the lining and stitch the opening closed.
Tuck the lining inside the bag and distribute it evenly, then press around the top with an iron. Pin the top edge, then topstitch around the bag at ⅛" (0.3 cm).
Your bag is ready!
Here are some glamorous shots of the bag in Laajalahti, Helsinki. I’m in love with this denim bag, and I know it will get a lot of use this summer.


I hope you’ll create your own version and share it on Instagram. Please tag @nordiccrafter and @pfaff_suomi so we can admire your work!
Happy Sewing!💖


Comments